How to set up automatic Image Publishing
 Datawrapper visualizations are great for embedding on the web. Just copy the embed code, insert it in your page and your beautiful chart, map or table will be there for readers.
But maybe you’re using software where you can’t just embed an <iframe>. Or you need a preview image for your social media post. With our “Image Publishing” feature, you can configure Datawrapper to automatically generate images of your visualizations whenever you hit publish.
This feature is available for users on a Custom or Enterprise plan.
You can find more information about our pricing here.
Index
How to set up Image Publishing
To set up Image Publishing, first go to your Settings and Accounts section through the menu on the top right in Datawrapper. This will bring you to the settings for your active workspace. Now, click on Formats under the Configuration section. Here you can configure which files will be created automatically whenever your team publishes a visualization.
 Datawrapper will always create three default PNG images: plain_s.png, plain.png and full.png. But the real power comes from defining your own custom formats, which you can do by clicking on “Add static fallback format”. Add a filename, choose a size and a file type (PNG, SVG, or PDF):
You can then customize your output format as you're used to from the Publish step when creating a visualization.

If your image shouldn’t include the footer and header of your visualization, select “Just Visualization”. Then click save – and that’s it! Publishing a chart, map, or table will now create the additional images you defined.
Where to find the generated images
You can find the generated images in the same place as your visualization. Its URL looks like this one:
https://datawrapper.dwcdn.net/M5I3Y/8/
Remove the version number ( 8) from the URL, add your filename with extension and you should see the created image in your browser:
Example Image URLs of chart "M5I3Y"
https://datawrapper.dwcdn.net/M5I3Y/plain.png
https://datawrapper.dwcdn.net/M5I3Y/full.png
https://datawrapper.dwcdn.net/M5I3Y/pdf_export.pdf
…
You can download the images with your browser or directly link to them.
"I published a visualization, but the images are not at the URL. Why?"
By default, the images are created after your visualization is published: You can embed the visualization already, but the images might not be ready yet.
If you need the images at the same time as the embed code, click on the checkbox in the Image Publishing settings that says Wait for image generation during visualization publishing. Then the Publish step of each visualization will take longer, showing you the following message:
"How can I customize the image that my readers download?"
Sometimes, the chart you want to embed on your website isn't the same as what you want your readers to download from the "Download image" link. For example, you might want to embed your visualizations without a logo – but if readers use the "Download image" link below a visualization, you want them to get a PNG of your visualization that includes the logo.
That's possible with Datawrapper. First, make sure you turned on the image download options in the Layout tab of your visualization. Learn more about the Layout options here.
Then, define your preferred PNG format in the Image Publishing settings. We defined a with-logo.png format.
Under Additional options, set Show logo to always show the logo, even if your embedded visualization does not.

Now scroll down to Select downloadable image and choose which image format readers should get (with-logo.png in our case) when they click on Download Image in your visualizations.
What to use Image Publishing for
There are a lot of ways how to use this new feature. All of them will reduce the need to manually export your chart, map, or table. Here is a list of some use cases:
Newsletters and RSS feeds
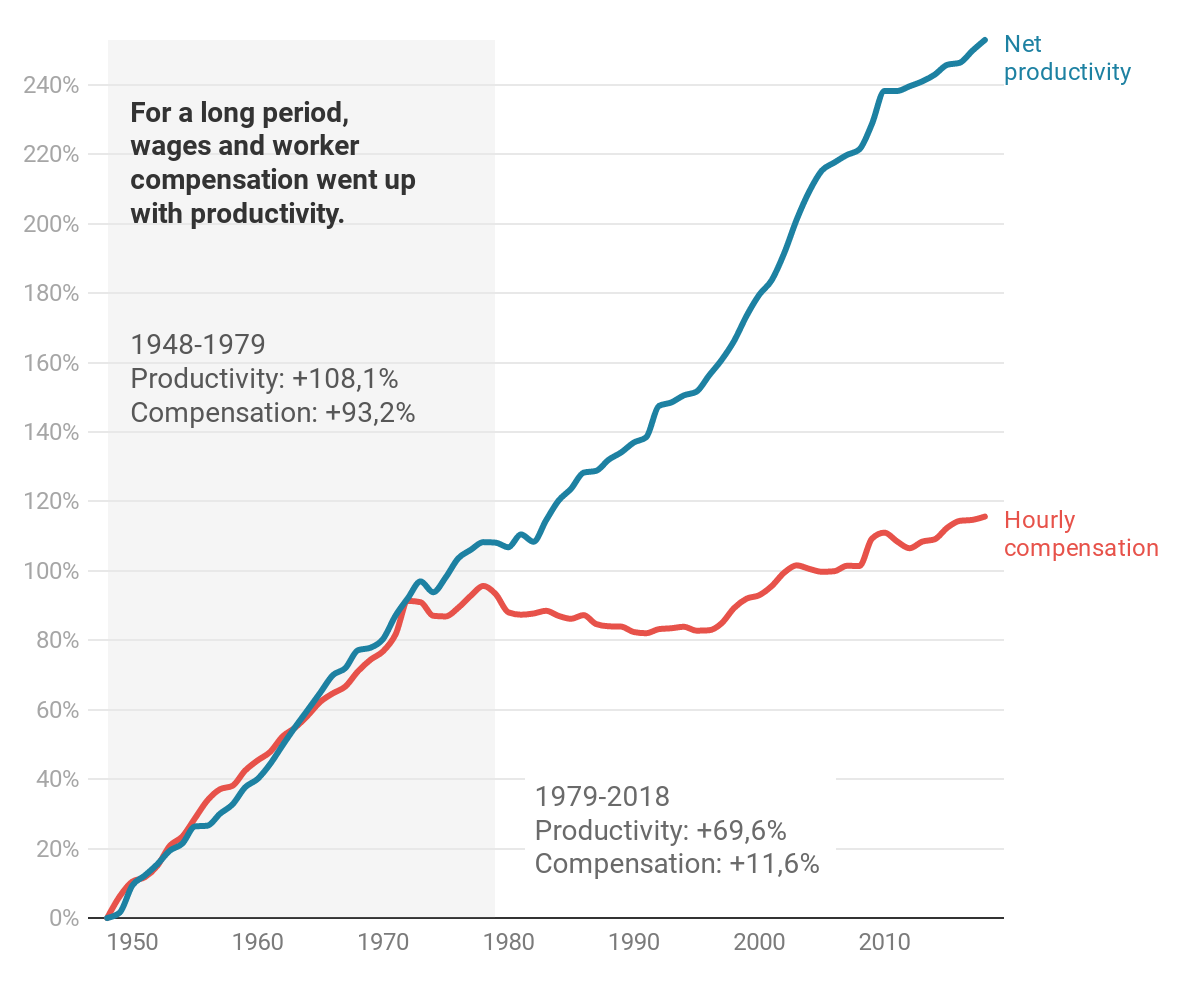
Email newsletters and RSS feeds don’t support embedding of <iframe> elements, but if your article references a visualization it would be odd to not include it. With Image Publishing, you can generate a fallback image for these cases, like so:

Social Media
Let’s say you wrote an amazing article with a Datawrapper visualization embedded and want to promote it on your Twitter or Facebook profile. A post with an image is usually better for engagement, and now you can use Image Publishing to generate automatic preview images for your links.
Thumbnail images inside your CMS
You can set up an integration with Datawrapper’s API to display a list of your team’s Datawrapper visualizations directly in your content management system (CMS), similar to what you can see in “Team Charts” on Datawrapper. This can make it super simple for editors to write an article and find the correct visualization without ever leaving your CMS.
We hope this article helped you to set up Image Publishing. If you have any questions left or have special requirements, get in touch with us at support@datawrapper.de.