How to insert images almost anywhere
In Datawrapper, you can use HTML to insert images to tooltips, locator maps symbols, tables, footnotes/titles/descriptions/text annotations and in iframes as background image.
- Insert images in tooltips
- Insert images as markers in locator maps
- Insert images in tables
- Insert images in footnotes, titles, descriptions, and text annotations
- Insert images in the iframe as background
- "I see a broken image icon"
Insert images in tooltips
To add images to tooltips, you can use the HTML <img> tag. Copy and paste the following code to the tooltip text field:
<img src="https://upload.wikimedia.org/wikipedia/commons/c/cb/Amsterdam_%28NL%29%2C_Anne-Frank-Huis_--_2015_--_7185.jpg" width="100%">
Replace the image address link with the URL for your image. Make sure to keep width="100%". This will make the image as wide as the tooltip allows. (Otherwise, your image becomes super big; bigger than the tooltip):

If you’ve never seen this before, here’s a short explanation: <img> is an individual element in HTML. It shouts out to everyone who wants to hear it (e.g. your browser) that we want to use an image. In <img> src– and the width of the image –width.
The source has to be an address. This could be an address of vacation pics on your computer. But then only you can see
To get the url of the image, right click on the image and select " Copy Image Address" from the menu:

Insert images as markers in locator maps
Datawrapper locator maps offer more than 130 symbols that you can select when creating a new marker. To learn how to do so, visit our article How to style point markers. In case you want to use custom icons, you can add them with the HTML image tag in your "marker text" field, like so:

Here's how to insert e.g. the flower icon:
Flowers <img alt="flower" src="https://openmoji.org/data/color/svg/1F33A.svg" height="40px" align="center">
- Flowers is the label that shows up as the word.
<imgis the beginning of the HTML code – or, more specifically, the image tag. The<sign tells the browser that until the>sign, everything should be interpreted as HTML. The order of parameters between the<and>sign doesn't matter.alt="flower"is the alternative text that describes the image. A more accurate alternative description would be "icon of a flower", but you can also use it to keep an overview of the images for yourself in case the image addresses are too cryptic.src="https://openmoji.org/data/color/svg/1F33A.svg"is the address ("src" for "source") of your image. Here we link directly to an SVG hosted by OpenMoji. You could also upload an image yourself to an own server or to e.g. imgur.com.height="40px"defines the height of your icon in pixels. You can play around with the height until you're happy with it.align="center"sets the alignment of the label ("Flowers") and the image.
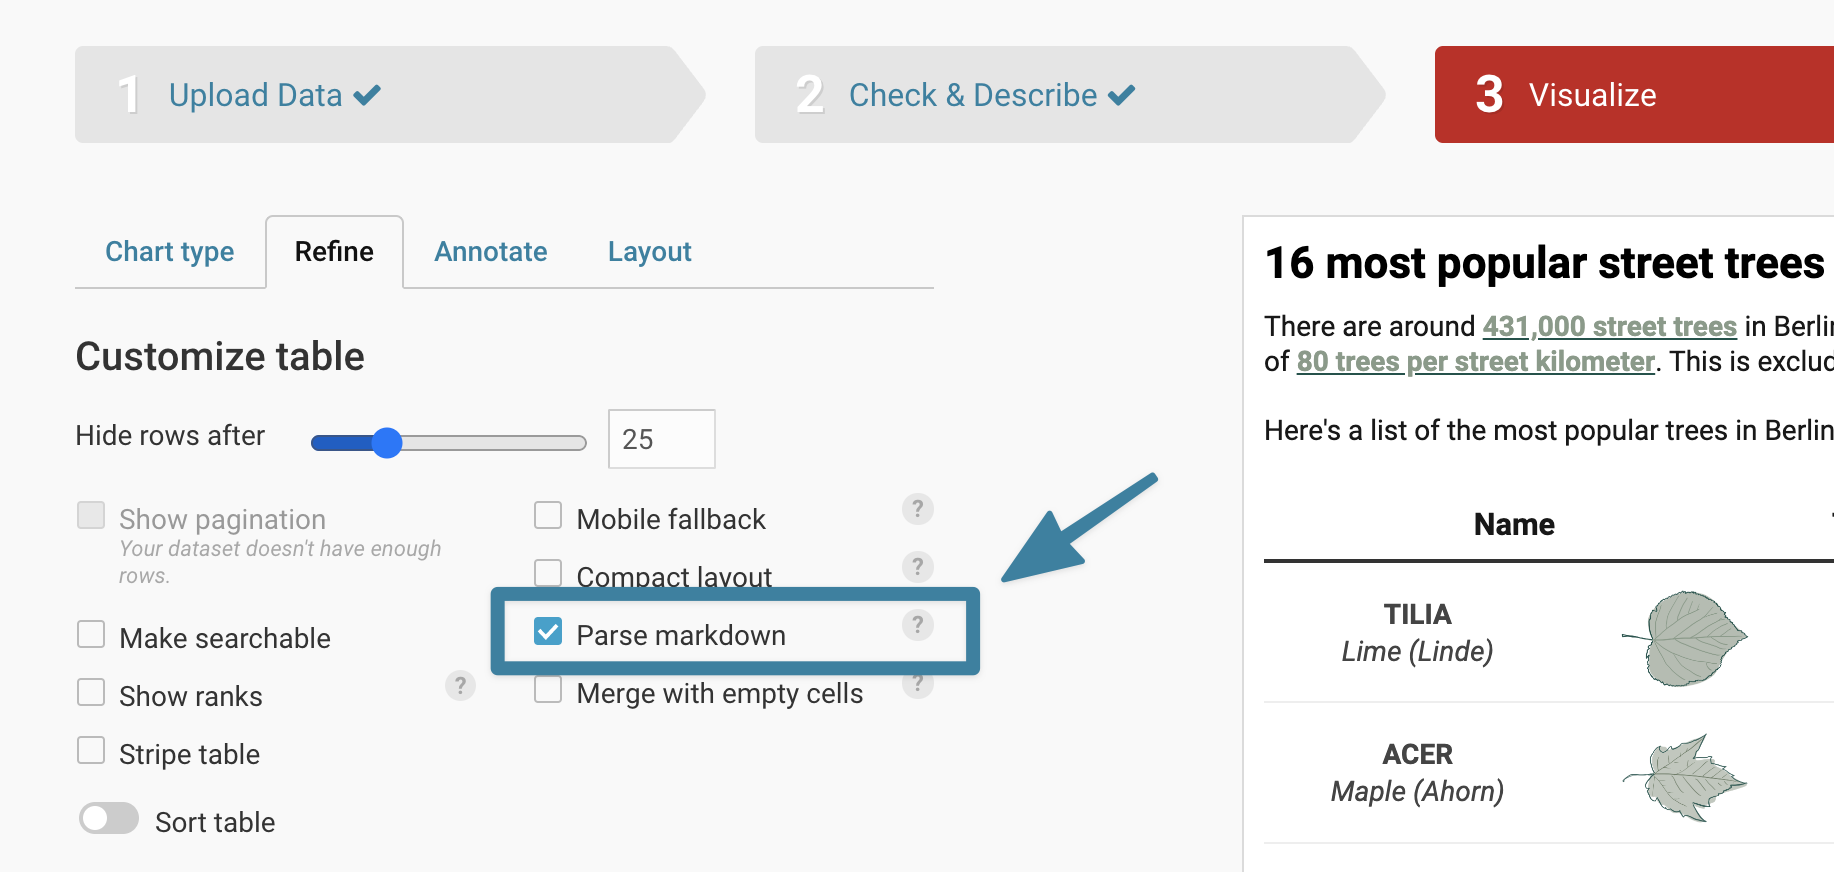
Insert images in tables
To add images in Datawrapper tables, you cannot use HTML <img> tags. Instead, you can use markdown image link to do the same thing. Enter an! followed by alt text (optional) wrapped in [] and then the image URL wrapped in (), like so:

Here's an example.

Then, make sure that
- your URL starts with HTTPS and not HTTP
- your URL is publicly accessibly online
- Parse markdown option is selected (image below)
That's it!
Changing the image size
Markdown doesn't allow you to set a specific size, so to increase the size of the image, increase the font-size of the column from Step 3: Visualize:

Or, you could also wrap it in an HTML tag <span> and give it some style:
<span style="font-size:50px;"></span>
Insert images in footnotes, titles, descriptions, and text annotations
To insert images e.g. in the footnotes we can't directly use the <img> tag. Instead, we use the <b> tag and give it a background image:
<b style="float:left; margin: 5px; width: 50px; height: 30px; background: url(https://media.giphy.com/media/sIIhZliB2McAo/giphy.gif); background-size: 50px 30px;"></b>

By inserting your code into a text annotation, you can place an image almost anywhere in your charts and maps:

Insert images in the iframe as background
There are a few things you can do to customize your iframe.
For example, you can change the background color of the visualization by adding a background-color to the style attribute in the embed code.
background-color: yellow;
You can even set a custom background to the visualization by adding an image url in the iframe code:
background-image: url('https://your-image-address.com');
like so:
<iframe title="Share of individuals using the internet, 2015" aria-label="Map" id="datawrapper-chart-TNscZ" src="https://datawrapper.dwcdn.net/TNscZ/4/" scrolling="no" frameborder="0" style="width: 0; min-width: 100% !important; border: none; background-image: url('https://images.unsplash.com/photo-1563291074-2bf8677ac0e5?ixlib=rb-1.2.1&ixid=eyJhcHBfaWQiOjEyMDd9&auto=format&fit=crop&w=702&q=80');" height="510"></iframe>
image credit: Annie Spratt
"I see a broken image icon"
If you see an image indicating a "broken image" instead of the actual image, make sure that your image is publicly accessible and served over HTTPS (and not HTTP). Datawrapper visualizations are all loaded over a secure HTTPS connection. Some browsers like Chrome block mixed content (insecure http:// subresources on https:// pages). To make sure your inserted image is displayed in all browsers, check that your content uses a secure HTTPS connection.
(Also, if you use images that you haven't created and are not under an open license, make sure to attribute the photographer/creator.)